Mirror guide
How to Install an LED Bathroom Mirror
 By Joan Bardot · Updated 3 sources cited
As an Amazon Associate I earn from qualifying purchases. How I choose products.
On this page
Learning how to install an LED bathroom mirror is mostly about order. The mounting is the same kind of job as hanging any heavy mirror. What makes this one different is the power: it decides where the cord goes, where the mirror sits on the wall and whether you need to call someone licensed before you start.
Below I cover the plug-in or hardwired decision, the few tools you need, the mounting steps in order, how to drill into tile, and what an electrician actually does when a mirror is hardwired. If you haven't bought the mirror yet, my picks for the best LED bathroom mirrors compare the models themselves; this guide is about the process once it's in the box.
Plug-In or Hardwired?
Every install guide I trust starts with the power, because it sets the height, the tools and who does the work. Check the back of your mirror and the manual before you pick a spot on the wall.
How LED Mirrors Get Power
LED mirrors get power one of three ways: a cord that plugs into an outlet, a connection to the house wiring inside a junction box on the back of the mirror, or batteries. WarmlyYours, which makes hardwired LED mirrors, describes the black junction box on the back as the place where the "mains in" connection is made, and says the wall box should sit directly behind it once the mirror is up. Which type you have is on the product page, so settle it before you buy rather than after you've marked the wall.
Plug-In With a Hidden Cord
A plug-in mirror is the simplest option, and the one I'd pick for a rental or a first install. The catch is the cord. Hanging straight down the wall it looks untidy, so most people run it behind a vanity or a cord cover, or have an electrician add an outlet behind the mirror. Adding an outlet is wiring work, so that part goes to a licensed electrician too. Plug the mirror into a GFCI-protected outlet, a point I come back to below.
Hardwired From a Junction Box
A hardwired mirror has no cord. It connects to a junction box in the wall, and it is usually switched from the wall like a light. That gives the cleanest look and is the usual choice in a renovation, but the connection itself is the one step I won't walk you through. Mirror makers want it done by a licensed electrician, and I explain why in the hardwiring section below.
Battery Models
Some small lighted mirrors run on batteries. They hang like any light mirror and need no electrician, but they are usually smaller and simpler, without the large anti-fog panel of a full bathroom mirror. If you want a defogger or a big front-lit panel, you are in plug-in or hardwired territory, and my LED bathroom mirror picks say which models offer which.
What You Need
Most LED mirrors ship with some mounting hardware, but it is worth checking it against the weight. These are the extras I would have on hand.
-
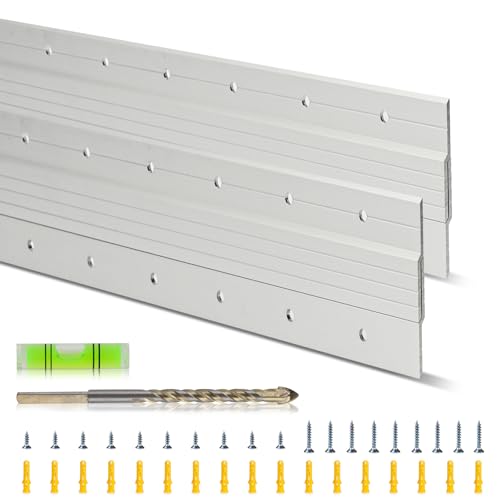
1French cleat
WINSMAR 24" French Cleat, 2 Pairs
Two pairs of 24 inch aluminum interlocking cleats that WINSMAR rates at up to 150 pounds, with screws, wall plugs, a drill bit and a bubble level in the box. A good swap if the cleat that came with a heavy mirror looks light.
-
2Z-bar
DaTools 18" Z-Bar Hanger, 2 Pairs
Shorter extruded aluminum Z-bars rated by DaTools at up to 90 pounds, for frames up to 30 inches wide; the maker says to use two side by side on wider frames.

What Else to Have Ready
WarmlyYours lists the same basics for its hardwired mirrors: a drill with bits suited to your wall type, a level, a tape measure, a stud finder, and wall anchors rated for the mirror's weight. Add painter's tape for marking, a pencil, and a helper. An LED mirror with a glass panel and a driver box is heavy and awkward, and WarmlyYours itself recommends a second person for lifting and hanging.
If you haven't settled the size or the height yet, do that first with my guides to what size your bathroom mirror should be and the standard vanity mirror height.
How to install an LED bathroom mirror
-
Unbox it and read the back
Lay the mirror face down on a soft blanket and look at the back: the mounting points, the cleat or bracket, and the cord or junction box. Test the lights and the touch switch only if the mirror is the plug-in kind and the manual says you can, otherwise wait. Check every screw and bracket in the box against the weight on the label.
-
Mark the height and the center
WarmlyYours suggests a mirror center at roughly 60" to 64" from the finished floor, with 4" to 6" of clearance above the faucet and backsplash. Those are the maker's figures for its own mirrors; your ceiling, your vanity and your household's height can move them. Hold the mirror up with a helper, step back, and mark the top corners with painter's tape. Mark the center of the vanity on the wall and line the mirror up with it.
-
Find the studs
Run a stud finder across the wall at the height of the mounting points and mark every stud with tape. A stud is the strongest place for a screw. If the mounting points don't land on studs, you'll need anchors, and anchors only help if they are rated for at least the mirror's weight. For a deeper look at fasteners, see my guide to how to hang a heavy mirror.
-
Fix the wall bracket or screws
Use the mirror's own template or hold the cleat or bracket against the wall, check it with a level, and mark the screw holes. Drill pilot holes, drive in the screws or anchors, and put a level on the bracket once the first screw is in. On a keyhole mount, set the screws so the heads clear the slots by the thickness the manual states.
-
Connect the power
For a plug-in mirror, leave the cord unplugged and route it where you want it to go. For a hardwired mirror this is where the electrician works, with the power off at the breaker. Do not attempt it yourself unless you are licensed and qualified to.
-
Hang the mirror
With a helper, lift the mirror onto the bracket or the screws and let it settle fully. Check that it is level and that nothing is pinching the cord. Then push and pull gently at the corners to confirm it is held securely.
-
Test the touch switch and the defogger
Switch the power on and press the touch control. Run through the light settings, then switch on the defogger and look for warmth in the glass after a few minutes. If anything fails, turn the power off and go to the troubleshooting section below.
Installing an LED Mirror on Tile
Tile is a common reason people hesitate, but the answer from WarmlyYours' installation guide is plain: you can mount on tile with a carbide or diamond-tipped bit, drilling slowly, and anchors rated for the full weight. It also says to confirm that the wall behind the tile can support the load, which is the part I'd check twice. Tile only adds a hard surface in front of the wall. The wall behind it is what holds the mirror up.
Drill Bits and Technique
Use a bit made for tile, not a standard bit. Start on the lowest speed, apply light pressure and let the bit do the work, and keep the drill straight. Drill in the middle of a tile where you can, not at the grout lines or the edge, because tile near an edge is more likely to crack. Once you're through the tile, switch to the bit that suits the wall behind it for the anchor.
Tape So the Bit Doesn't Skate
A drill bit tends to wander on a glazed surface before it bites. A piece of painter's tape over the spot gives it something to grip and shows your mark clearly. Put the tape on, mark the hole through it, drill through the tape, and peel it off once the hole is done. The tape also catches a little of the dust.
Hardwiring: What an Electrician Does
I'll keep this at a high level on purpose. Makers are clear that wiring is not a weekend job. WarmlyYours advises a licensed electrician for hardwired connections and says to turn off power at the breaker and verify it with a voltage tester. Electric Mirror states that its mirrors "must be installed by a qualified, licensed electrician" and in line with the latest National Electrical Code, and failing to follow its instructions can void the warranty.
What the Electrician Does
In general terms, a licensed electrician makes sure the power is off, connects the mirror's supply to the wiring in the wall box behind it, checks the connection, restores power and tests the mirror. If the plan means adding a circuit or moving a junction box, that is the kind of work WarmlyYours says belongs with a licensed electrician. Bring the mirror's manual and the exact model, since the wiring details differ by maker.
After Install: Troubleshooting
If the lights don't come on after install, work from the outside in. Check the plug-in cord is seated and the GFCI outlet hasn't tripped: press its RESET button. For a hardwired mirror, check the wall switch, and leave anything behind the mirror to your electrician. If the mirror works but the lights flicker or one section stays dark, see my guide to fixing a vanity mirror light.
WarmlyYours' FAQ notes that many LED mirrors have a built-in touch or rocker switch on the front, but the wall switch or breaker still controls the power to the circuit. So a dead touch button often means the circuit is off, not that the mirror has failed.
Sources
- WarmlyYours: How to Install an LED Bathroom Mirror, Mounting & Wiring Licensed electrician for hardwired connections, the "mains in" junction box, 60" to 64" center height, 4" to 6" above the faucet, tile mounting and anchors rated for the weight.
- Electric Mirror: Installation Instructions Installation by a qualified, licensed electrician in line with the latest National Electrical Code.
- IAEI Magazine: NEC Requirements for GFCI Protection, Section 210.8 Bathrooms listed under 210.8(A)(1) for dwelling units in the 2017 and 2020 NEC.
Keep reading: Best LED bathroom mirrors · How to hang a heavy mirror · Standard vanity mirror height · What size bathroom mirror · Fix a vanity mirror light
The MirroRank letter
New mirror picks, sizing and lighting tips from Joan, about once a month.